
Crocheters-
Here's another pattern for ya. ;)

This pattern is kind of like a variation of the owl one I just posted, only a sock monkey.


Should I do a panda or a zebra next??
Or... (my awesome dad's idea) ... a penguin?
I'll let ya'll choose, in celebration of
10 followers!!!

I know 10's not much, but I'm getting there, and the support really helps push me along. I will continue on!!
The one with the most votes, I will do next and post the pattern. ;)

Mini Sock Monkey Purse
Materials:
Hook: Size G or 7
Yarn: (worsted) Color A: Base color: brown or tan for purse. Small amounts of black for eyes. Color B: Accent color: red, preferably dark red, for outlining, strap, and lips and white for bow.
Scissors: For fabric
Tapestry Needle: For weaving in ends and sewing on eyes and mouth
Markers or small piece of different colored thread: For keeping track of where your round ends/begins
Ruler or tape measure
A button, in a dark color, about half an inch in diameter
Gauge:
8 half double crochets would equal 2" With a size G hook. 4 single crochets would equal 1".
Abbreviations:
ch: chain
sl st: slip stitch
sc: single crochet
hdc: half double crochet
dc: double crochet
tc: treble crochet or triple crochet
If you happen to find any errors or come up with a different number of stitches, please contact me so I can fix it. But I counted twice before I recorded it, and made some extra with this pattern, so you should be good to go. ;)
Purse:
Rnd 1: Using base color, Ch 32. Sc 3 in 2nd ch from hook. Sc across, to first ch. Sl st in last ch. (That's 2 sts in 1 st)
Rnd 2: Turn to work along other side of ch, 3 sc in first ch. Sc (30) to end if ch, and into first sc. (See visual B) In second sc, sc 3. Sc to end of rnd. Here, take a marker or different colored piece of yarn and insert it into your last st. (Visual C) This will mark every new round. Take it and move it up at the end of every round. (70 sts all around)
Rnd 3: Sc 30. Work 2 sc in next 4 sts. Sc 31. Work 2 sc in next 3 sts, sc in last st. (Remember: move up your marker) (76 sts around)
Rnd 4: Sc 33. Work 2 sc in next 3. Sc 35. Work 2 sc in next 3. Sc in next 2. Still in last st, ch 2, 1 hdc in st at bottom of ch 2, and move your marker into that st. This will be your new round end. (82 sts, and that's counting the ch 2 and 1 hdc)
Rnd 5: hdc 34. Work 2 hdc in next 4 sts. Hdc 37. Work 2 hdc in next 5 sts. Hdc 3, move up marker. (92 sts around)
Rnd 6: hdc 35. Work 2 hdc in next 6. Hdc 40. Work 2 hdc in next 6. Hdc in last 5. Move up marker. (104 sts around)
Tip: (See Visual E.) Once the rows get really long, I like to count ahead the amount of stitches I'm supposed to crochet and put a marker there. For instance, in Round 6, I had to crochet 35. I counted 35 (by 3's) stitches and put a marker there. This saves me some counting or keeps me from loosing track and having to start over counting along.
Rnd 7: (Really? Another round?) ;) Hdc 10. (Ear:) Work the following into one st, the next st: 2 sc, 2 hdc, 1 dc, 3 tc, 1 dc, 2 hdc. Skip next st (its too covered to try and work a st into it) and sl st in next st. (See visual F for ear) Hdc 30. Work 2 hdc in next 6. Hdc 30. (Other ear:) Work the following in next st: 2 hdc, 1 dc, 3 tc, 1dc, 2 hdc, 2 sc. Skip next st, sc in next st. Hdc 15. In next 4 st, work 2 hdc. Hdc 3, sc 2, sl st in last st. Fasten off,
Set aside. ( visual G)
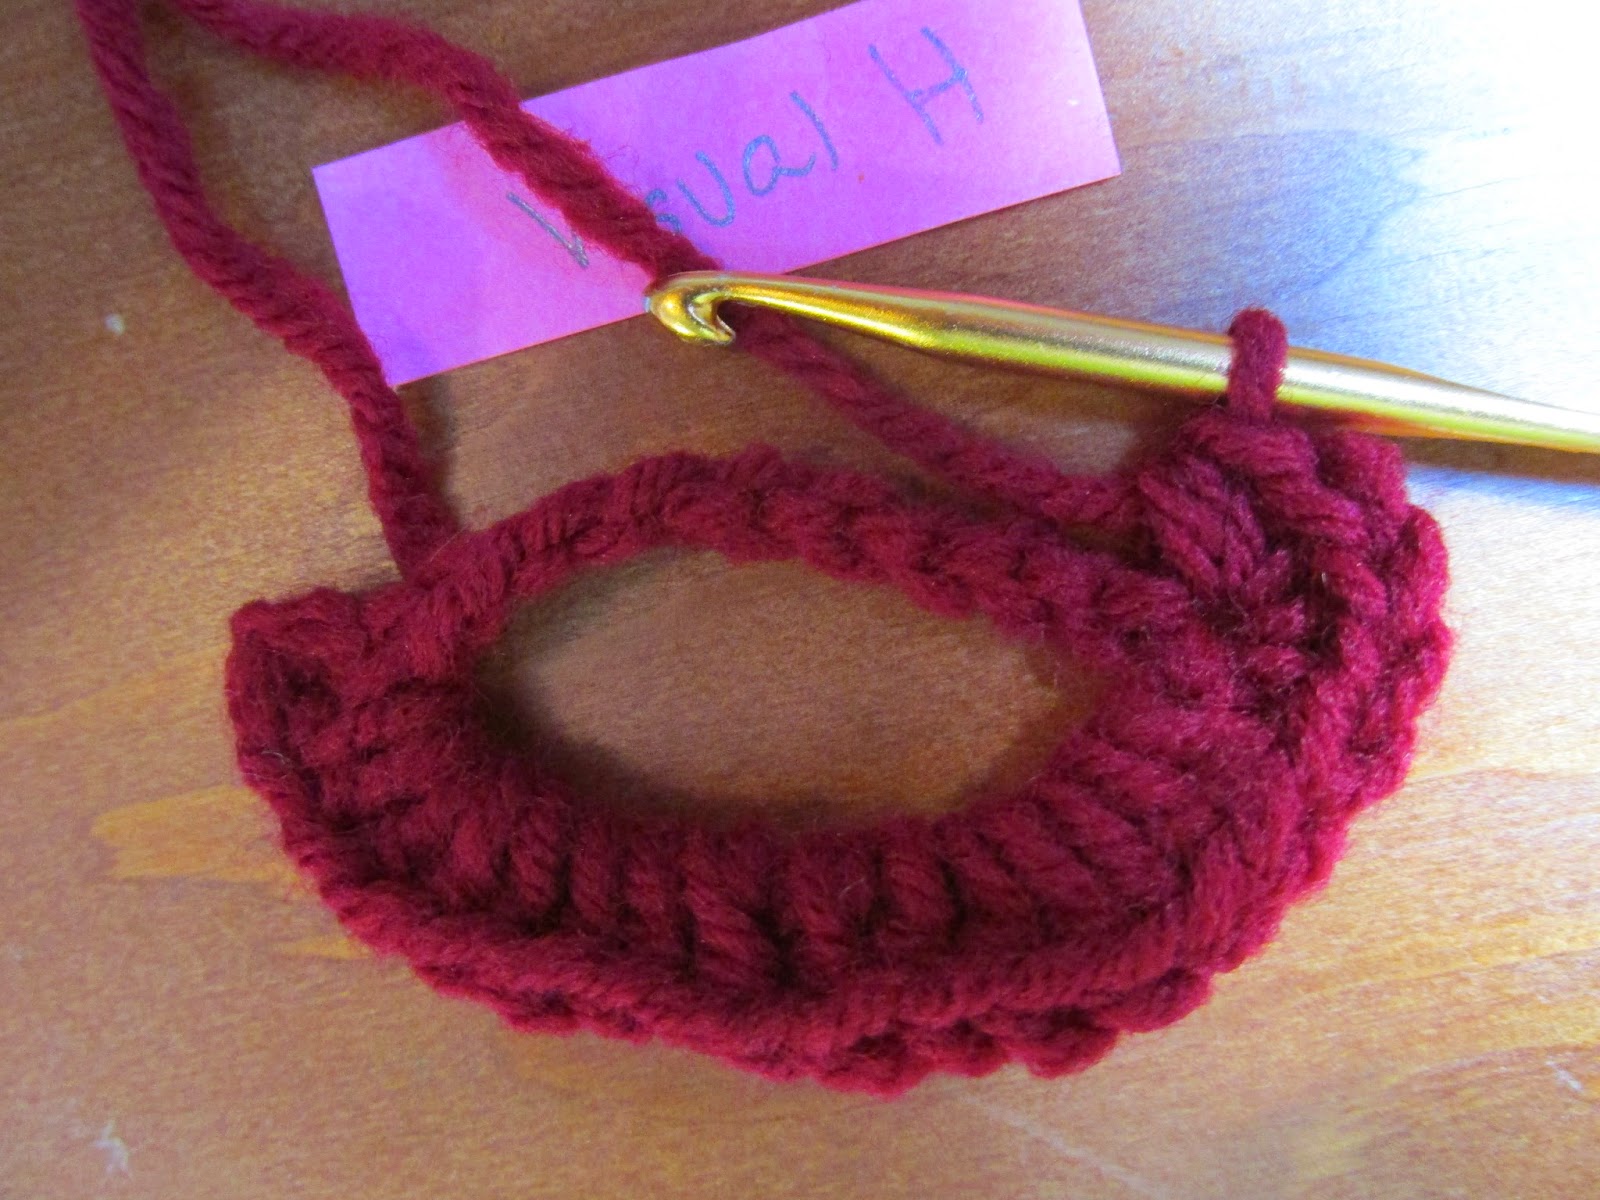
Lips:
(Visuals H)
Using red,
Ch 18. Join with first st to make circle. Ch 2, hdc 15 in circle as if it were one big st loop. Slide the 15 sts to first side (see a visual h) there are 11 chs on other side of oval. In that 11th st from the first ch, hdc 5. Hdc 12 in oval. Slide to even out, and hdc 5 in very first ch. Join with top of ch 2, fasten off.
Eyes: make two
(Visuals I)
Using black,
Ch 3. Join to make circle. Keep two fingers touching in the middle of the circle, since its so small, you might loose it. Ch 1. Hdc 8 in circle, join, fasten off.
Sew on the eyes and mouth. (Visuals J) Sew eyes on right side of the fabric, on the end where the ears are closer to the end. Sew eyes about an inch apart. Eyes should cover about 3 rows. See visual to help. Sew on mouth to a faint smile with the top f the mouth about 2" from end. When you sew it on, make sure there's room under the upper lip for your button. (See step titled "button")
Sewing purse together
(Visuals K)
Put your ruler on the side with the mouth and Aline the 5" mark with the end of that side. Look where your ruler ends and fold it to that point, wrong side facing out. Now tuck your ears inside the fold so that they stick out right when ur done seeing and u flip ur purse right side out. Start on the bottom of the fold, but make sure you are 12 sts from the ear. Put your hook on a slip knot using red and insert thru first two loops, joining fabric together. Sl st. Sc thru both loops in next 12 st. Here it gets a bit tricky. See visuals (k) to help. Try to create 3 sts across the ear, continuing to join with side without ear, with its own next 3 sts, but try doing it behind ear. Sc in next two loops after ear. Quit working thru two loops and work thru loops across flap. Sc 18. Ch 5. Create loop with ch by sc in next st. Sc 17. Count the sts across the edge with the mouth, starting at first single loop from your last st joining. Count 15, join that 16th st with the st your hook is on now. Work 3 sc across ear, joining with next 3 sts on bare edge. Join to end. Fasten off. Turn right side out.
Button:
Sew on your button underneath the upper lip, keeping it hidden.
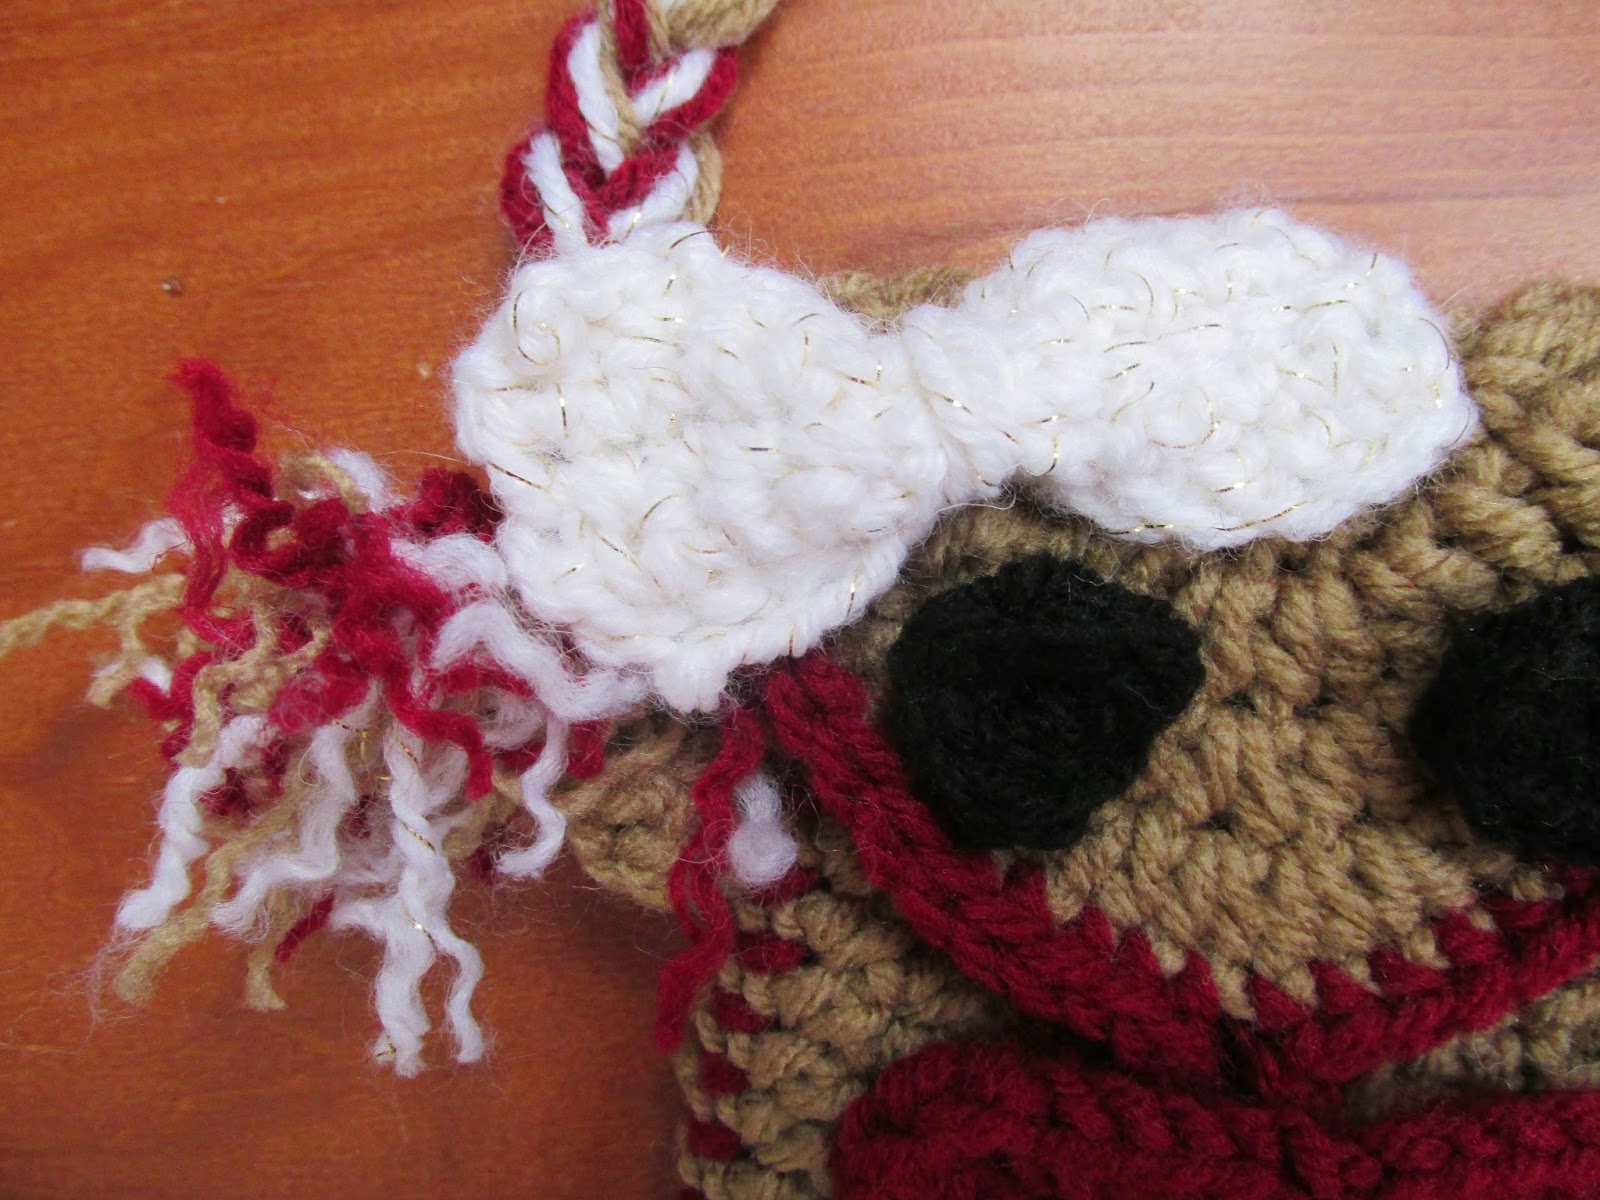
Bow:
Using white,
Ch 12. Sc in second ch from hook. Sc to end 10. Ch 1, turn, sc across. Repeat until you have 5 rows of sc. Take a piece of yarn and just tie it tightly around your rectangle. Sew it to the flap above one eye (doesn't matter which).
Strap:
Cut 18, 35" 6 of each color: red, tan, and white. Mix thoroughly, thread one end thru the second st above one ear. Leaving about 6" on shorter end, double knot short end with long. Unravel threads on shorter end. Braid long end, dividing 6 threads into three groups. Braid until you have 7" left, double knot, repeat as before.
Even out anything, weave in any ends, and enjoy your mini sock monkey purse!
If you happened to find any errors or came up with a different number of stitches, please contact me so I can fix it. But I counted twice before I recorded it, so you should be good. ;)
This pattern was created by Bree. I saw something different that inspired me to make something like it, and came up with my own pattern. If I have copied someone else's pattern exactly, it was completely coincidental. I am sorry for any coincidences. I did not mean to violate any copyrights.
Visual Help:


Enjoy your creation!

This is amazing! It's so pretty, I'd love to see you do a penguin next time! Congratulations on 10 followers! Woohooo!!<3
ReplyDeleteJune
The Journeys' of my beating heart
A penguin? Ok, that's one vote... ;) I think a penguin would be really cute, too. And thanks!
Deletexoxo,
Bree
I love this!!! Those are adorable!!! I love all your crafty tutorials. :) 10 followers? Congrats!!! Your blog is amazing so it's only a matter of time when you'll have 50 followers!! Your blog is growing so fast. :D
ReplyDeletehttp://eveofwomanhood.blogspot.com/
Aw, thank you, Eve! This really encourages me. I really got going because of that guest post over at Amelia's, I don't know how else to advertise it though. I can't find anyone else who does guest posts. Do you know of any? Not just to advertise, but because it was fun too. I enjoyed putting it together and receiving the sweet comments.
DeleteOh, and what's your vote for which animal I should do next? ;)
xoxo,
Bree
Lovely craft! Looks so cute. A penguin would be cool and congrats on your lovely 10 followers! Party!
ReplyDeleteBlog on // June
Wow, this is AWESOME! Maybe I'll give it a try. I do knit from time to time, but crocheting has always confused me!
ReplyDeletearushee | unadorned gifts